User Guide

Table of Contents
- 1. Introduction
- 2. About the User Guide
- 3. About sprINT
- 4. Features
- 5. FAQ
- 6. Glossary
- 7. Command Summary
1. Introduction
Are you a student who wants to avoid the hassle of managing internship applications? Look no further than sprINT, the ideal tool for streamlining this daunting process!
sprINT is a desktop application that can help YOU track your internship applications. Optimised for use by typing while offering a beautiful user interface, it will be a great asset in your internship application journey.
2. About the User Guide
In this section, you will find information pertaining to the user guide (the document you are reading now!). It includes details about who this guide is meant for and how to navigate this guide effectively.
2.1 Target Audience
This user guide is meant for anyone who wants to use sprINT. It is designed to provide clear and concise instructions for beginners to kickstart their sprINT journey, as well as for existing or more advanced users who wish to explore the full range of features that sprINT has to offer. Whether you are a new or seasoned sprINT user, this guide will be your best companion to help you get the most out of sprINT.
2.2 Using the Guide
If you are a new user, we recommend you to check out the Configuration and Setup Guide to learn how to set up sprINT quickly, before reading through the Short Tutorial to pick up a few simple commands.
If you have already used sprINT before, feel free to use the Table of Contents to navigate to the section you are interested in, or skip directly to a specific command in Features that you wish to learn more about.
2.3 Understanding Notations
Throughout the rest of this user guide, you may encounter certain notations like the ones below. Here’s how you should interpret them:
Tips
Tips are useful suggestions that will help you become a seasoned sprINT user quicker.
Notes
Notes are important information that you should pay attention to when using sprINT.
Caution
Cautions are in place to warn you of potential pitfalls you may encounter, especially for new users of sprINT.
Scenario
Scenarios provide examples of specific situations in which a feature would be useful or necessary.
Return to the Table of Contents.
3. About sprINT
In this section, you will find basic information about sprINT that’s just enough to get you started. This includes a guide for configuring and setting up sprINT for first-time users, an overview of sprINT’s user interface, general notes about commands in sprINT, as well as a short tutorial.
3.1 Configuration and Setup Guide
Step 1: Ensure you have Java 11 or above installed in your computer.
If you are unsure of whether you have installed it, you can check so by first opening a command terminal
and then typing java --version. If it is not installed, it will probably prompt you with the following:
java is not recognised as an internal or external command
Fret not; you can refer to this online tutorial
for detailed step-by-step installation instructions.
Step 2: Download the latest sprINT.jar file here.
Step 3: Copy the file to the folder you want to use as the home folder for your sprINT application.
Step 4: Double-click on the jar file to run the application.
If double-clicking doesn’t work, consider trying an alternative method of opening.
Open a command terminal, enter cd with the path to the folder you put the jar file in,
and type: java -jar sprINT.jar to run the application.
cd stands for “change directory”. As the name suggests, it is a command that allows you to navigate
to another directory/folder on your computer.
An interface similar to the one shown below should appear in a few seconds. If you are using sprINT for the first time
on your device, the app will contain some sample applications already.
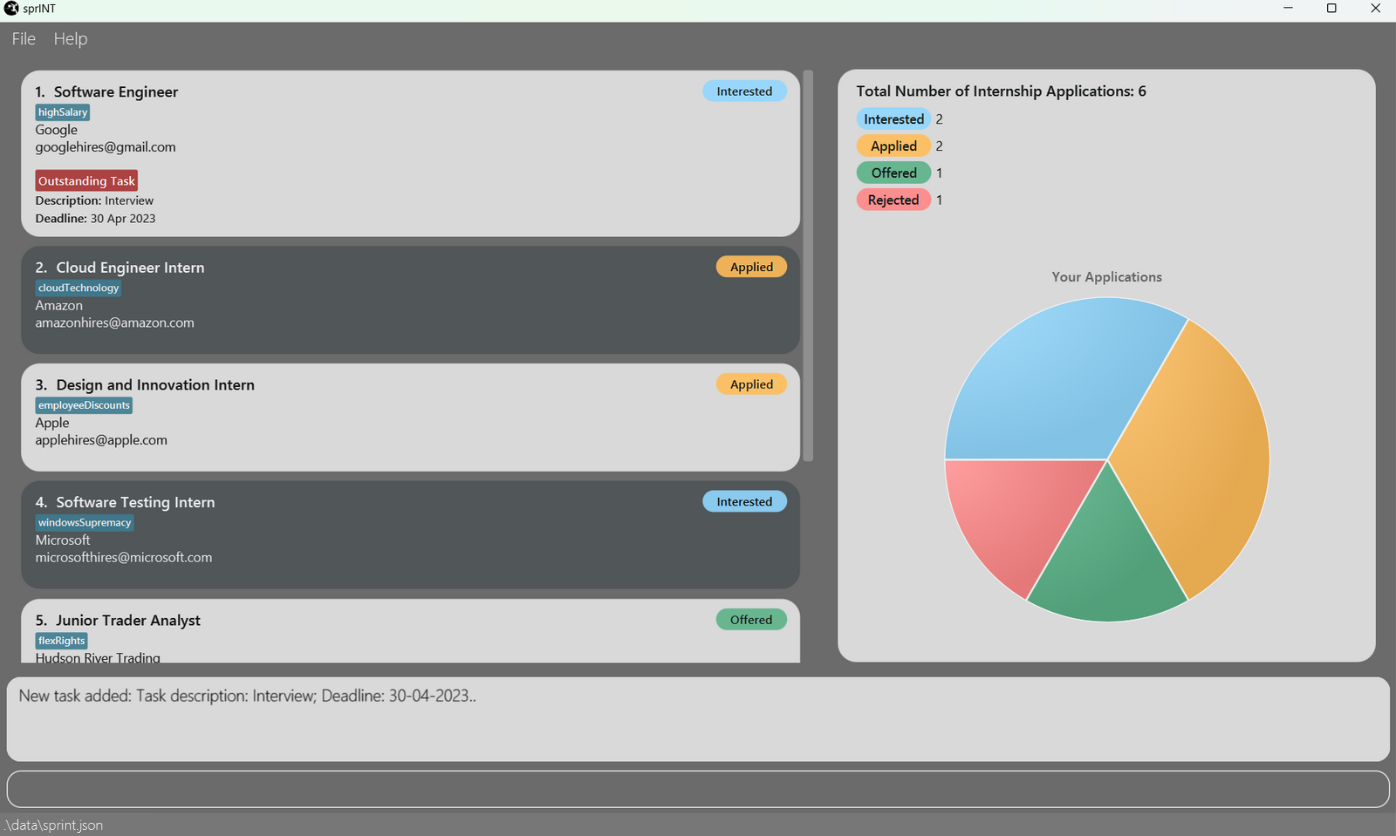
3.2 The User Interface
We understand that using an app for the first time can be a daunting experience. This is why we created this
section for you to quickly get acquainted with sprINT’s user interface.
The following diagram illustrates the general layout of sprINT’s app window.
The table below describes the function(s) of each component. Don’t worry if you’re initially confused and cannot remember everything; sprINT is designed to have an intuitive interface that should allow you to familiarise yourself with in no time. You are also welcome to revisit this section again anytime.
| No. | Component | Description |
|---|---|---|
| 1 | Toolbar | Contains buttons to exit sprINT (access by clicking the File button) and view help information quickly. |
| 2 | Application List Panel | Displays the list of all/filtered/sorted applications, depending on the issued command. |
| 3 | Application Card | Displays information about each application, including the role, company, company email, status and tags or outstanding task (if any). |
| 4 | Statistics Display Panel | Displays statistics about your internship applications, including a pie chart that updates automatically after every command you execute (so there’s no need to worry about updating it manually). Pretty neat, right? |
| 5 | Command Result Box | Displays feedback immediately after executing a command, indicating if it executed successfully, or if not, what went wrong (e.g. incorrect command format). |
| 6 | Command Box | This is where you type all your commands; press Enter on your keyboard to execute them. |
| 7 | Storage File Path | Displays the path of your sprINT storage file. |
3.3 About sprINT’s Commands
Before we delve into the individual features, here are some useful notes about the general format of all commands in sprINT:
![]() Notes about the command format:
Notes about the command format:
-
You cannot add more than 2147483647 applications, and you cannot delete or edit applications that have index greater than 2147483647. If you are a normal human being, we do not foresee this to be an issue for you!
-
Commands in sprINT are composed minimally of a command word. Most, but not all, commands also consist of prefixes and parameters.
-
Words in
UPPER_CASEare the parameters you need to supply.
e.g. inadd c/COMPANY_NAME,COMPANY_NAMEis a parameter which can be used asadd c/Google. -
Items encapsulated within square brackets
[]are optional.
e.g.c/COMPANY_NAME [t/TAG]can be used asc/Google t/highsalaryor asc/Googleonly. -
Items that come with
(s)means multiple parameters for the same prefix can be added, as long as they are separated by a space.
e.g.[t/TAG(s)]can be used ast/creditBearing t/highSalaryor ast/creditBearingonly.
(s) and []. The former allows for multiple parameters of the
same prefix, while the latter represents an optional parameter.
-
Command words and prefixes are case-sensitive.
e.g.UNDOwill not be recognised as a valid command for the undo operation. Similarly,bY/(instead ofby/) will not be recognised as a valid prefix for theadd-taskcommand. -
Parameters can be entered in any order.
e.g. if the command specifies the order ofr/ROLE c/COMPANY_NAME, typing your command in the order ofc/COMPANY_NAME r/ROLEis also acceptable. -
If a parameter is expected only once in the command, but you specified it multiple times, only the last occurrence of the parameter will be taken.
e.g. if you specifyr/SWE Intern r/Software Intern, onlyr/Software Internwill be taken as it is the latest occurrence of the prefixr/. -
Extraneous parameters for commands that do not take in parameters (such as
help,list,exitandclear) will be ignored.
e.g. if you specifyhelp 123as your command, it will be interpreted ashelp, and the help command executes.
3.4 Short Tutorial
Can’t wait to try sprINT out? Here is a sample sequence of commands to get the ball rolling:
-
add-app r/Software Engineering Intern c/Google e/google_careers@gmail.com s/interested: Adds a new application for a Software Engineering Intern position at Google to the internship book, with the status set to Interested. A new Application Card should appear at the top of the Application List Panel. -
delete-app 3: Removes the 3rd application shown on the Application List Panel. -
undo: Reverts the previous delete operation. -
add-task 2 d/Interview by/30-05-2023: Adds a new Interview task with deadline 30 May 2023 to the 2nd application shown on the Application List Panel. -
exit: Exits sprINT. Notice that there is no need to save your data manually, as sprINT does it for you automatically.
Congratulations on completing the tutorial! For the complete list of available commands, you may refer to the Command Summary section. For more details about each command, you may read on for the next section on Features.
Return to the Table of Contents.
4. Features
In this section, you will find detailed information about every feature in sprINT, including its syntax and usage instructions.
4.1 Managing Applications
This sub-section consists of commands that are related to managing applications in sprINT.
4.1.1 Adding an application : add-app
Adds a new internship application to your internship book for tracking.
Format: add-app r/ROLE c/COMPANY_NAME e/COMPANY_EMAIL s/STATUS [t/TAG(s)]
The following table details the parameters to be used with the add-app command:
| Prefix | Parameter | Compulsory | Parameter constraints |
|---|---|---|---|
r/ |
Role | Yes | Must be alphanumeric characters or spaces only. Cannot be empty. |
c/ |
Company Name | Yes | Must be alphanumeric characters or spaces only. Cannot be empty. |
e/ |
Company Email | Yes | Must be of the format: local-part@domain. local-part consists of only alphanumeric and the special characters +, _, ., -. Special characters cannot be consecutive, and cannot be the first or last character in local-part. Cannot be empty. |
s/ |
Status | Yes | Must be one of the four available statuses: interested, applied, offered, rejected. Input is case-insensitive. |
t/ |
Tag | No | Must be alphanumeric characters only. Cannot be empty. |
 If you forgot to add a tag to your application after it’s been created, or wish to add even more tags, refer to the
section here on managing application tags.
If you forgot to add a tag to your application after it’s been created, or wish to add even more tags, refer to the
section here on managing application tags.
Additional things to note:
- For more information about each parameter and other sprINT-specific terminology, feel free to refer to our Glossary.
Examples:
add-app r/SWE Intern c/Google e/google_careers@gmail.com s/interested t/creditBearingadd-app r/Data Analyst Intern c/Bloomberg e/bloomberg_hires@bloomberg.com s/applied
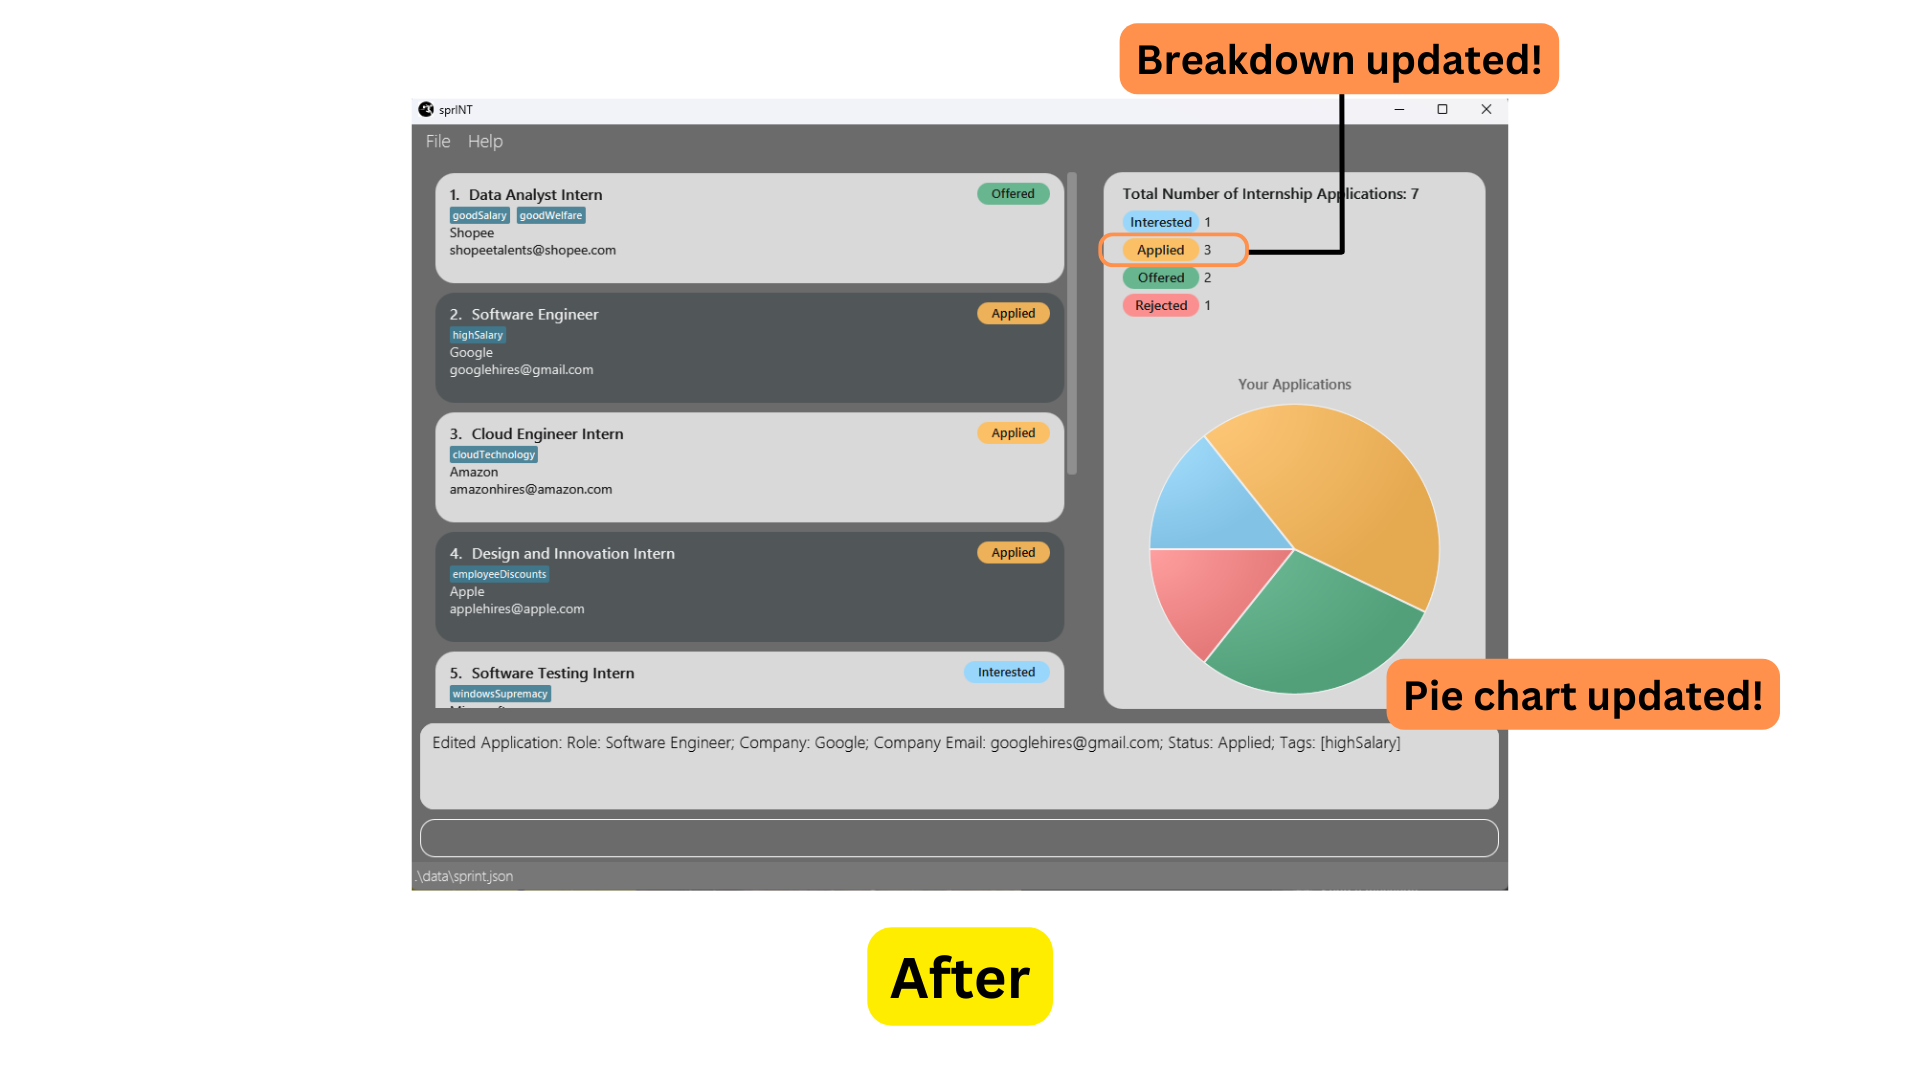
4.1.2 Editing an application : edit-app
Edits an existing application in your internship book.
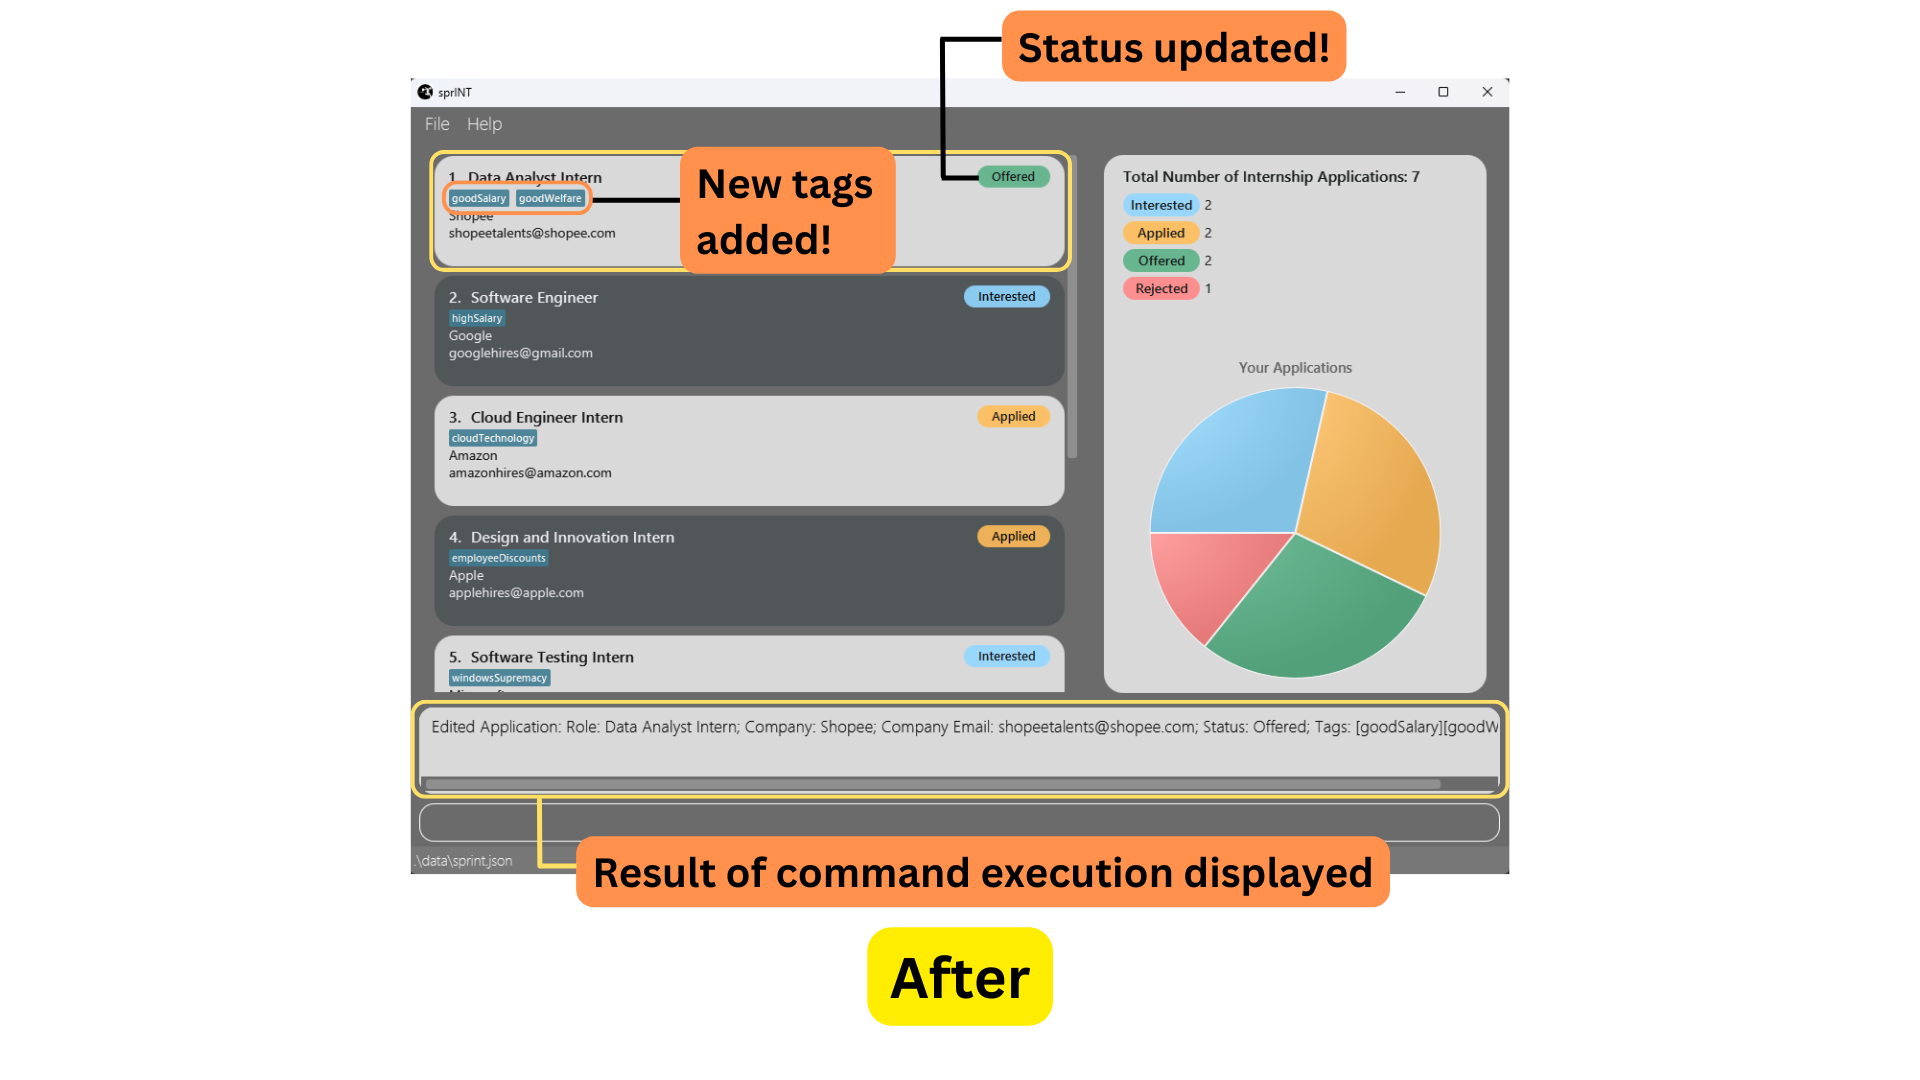
Spotted a typo in an existing entry, or want to update the status of an application? No problem! Just specify the index
and parameter(s) of the application you wish to edit, and edit-app will fix it for you.
Data Analyst Intern role at Shopee. You looked
through the contract and find yourself satisfied with the salary and employee benefits. At this point, you may
want to update the status of your application, and also add a few tags to indicate the decent terms of the contract.
You can make these changes to your existing application using the command: edit-app 1 s/offered t/goodSalary t/goodWelfare
(assuming that the application is showing up as the first one on the Application List Panel).
You may refer to the screenshots below for the before and after comparison of the execution of the edit-app command.
Format: edit-app INDEX [r/ROLE] [c/COMPANY_NAME] [e/COMPANY_EMAIL] [s/STATUS] [t/TAG(s)]
Additional things to note:
-
INDEXrefers to the index of the application to edit, as shown in the Application Card. It must be a positive integer. - At least one of the optional fields must be provided.
-
INDEXcannot be greater than 2147483647. - Existing values of the application entry will be updated to what you have inputted.
- Refer to the following section here to learn more about editing an application’s tag(s).
- For more information about each parameter’s constraints, refer to the table in section 4.1.1.
Examples:
-
edit-app 1 r/Cloud Engineer e/googleHR@gmail.com: edits the role and email address of the 1st application to beCloud EngineerandgoogleHR@gmail.comrespectively. -
edit-app 2 s/Rejected: edits the status of the 2nd application to beRejected.
4.1.3 Deleting an application : delete-app
Deletes the application you specify from your internship book.
This feature will come in handy if you no longer wish to keep track of an application, maybe because it is no longer available or relevant to you.
Algorithm Analyst Intern role at Hudson River Trading more than 3 months ago, but
have yet to receive a follow-up email from the company. At this point, maybe you’ve decided to better focus your efforts elsewhere
and do not intend to track this particular application anymore. You can choose to delete this application using
the command delete-app 1 (assuming that the application is currently showing up as the first one on the Application
List Panel).
Format: delete-app INDEX
Additional things to note:
-
INDEXrefers to the index of the application to delete, as shown on the Application Card. It must be a positive integer. -
INDEXcannot be greater than 2147483647.
Examples:
-
listfollowed bydelete-app 2: deletes the 2nd application shown on the Application List Panel. -
find Googlefollowed bydelete-app 1: deletes the 1st application shown on the Application List Panel after execution of thefindcommand.
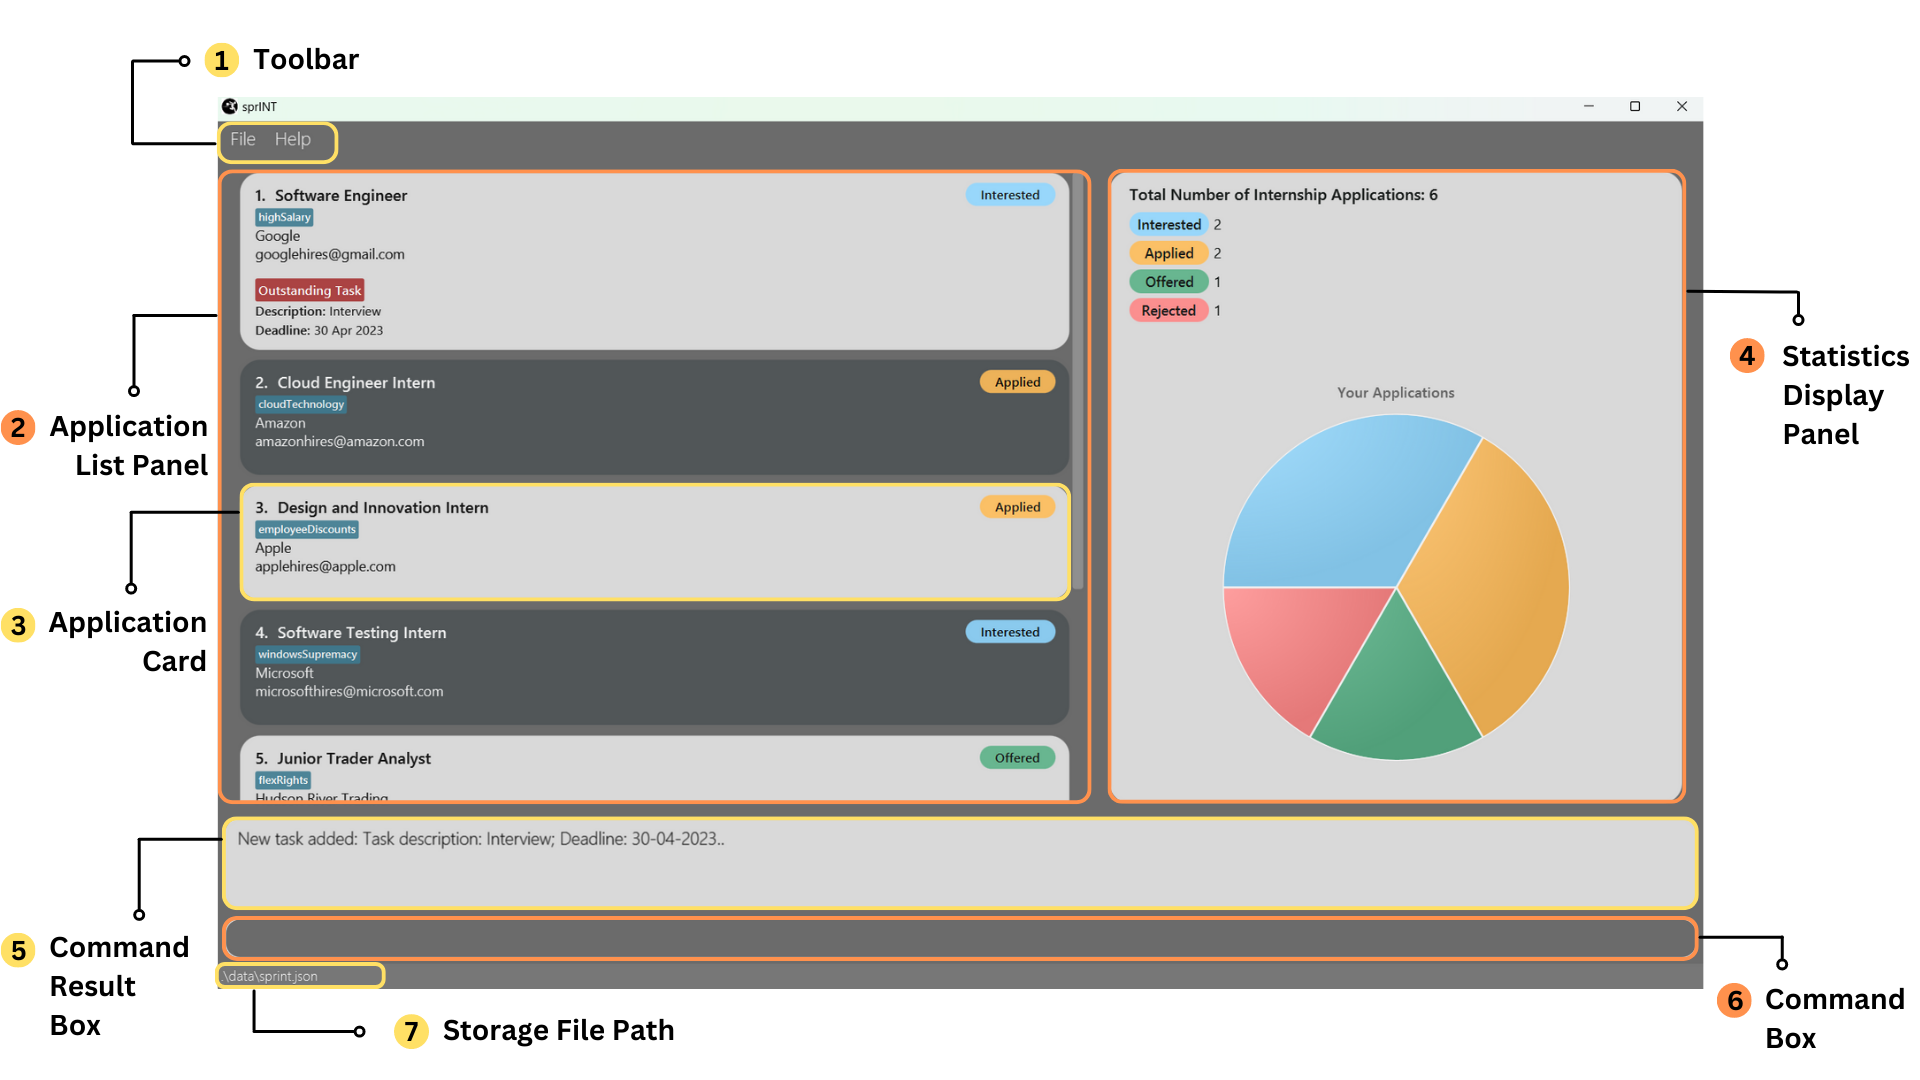
4.1.4 Managing application tags with add-app and edit-app
Adding tags
sprINT currently supports 2 ways of adding tags to an application entry:
- Tags can be added when you are creating a new application, as a parameter to the
add-appcommand. For more information, refer to section 4.1.1. - Tags can also be added to an existing application in the internship book as described below.
If an application does not have any existing tags, you can add 1 or more tags to the application using edit-app as follows:
Format: edit-app INDEX t/TAG(s)
Examples (assuming applications do not have an existing tag):
-
edit-app 2 t/doResearch: adds 1 tag to the 2nd application on the Application List Panel. -
edit-app 1 t/creditBearing t/workFromHome: adds 2 tags to the 1st application on the Application List Panel.
For example, if you wish to tag an application to remind yourself that it is for your dream company, you have to use
t/dreamCompany or t/dreamcompany, instead of t/dream company, t/dream-company and so on.
If an application already has (an) existing tag(s) that you wish to keep, you have to enter all existing tags AND the new tag that you wish to add.
highSalary tag, executing
the command edit-app 1 t/creditBearing would remove the original highSalary tag, and only the new creditBearing tag will be left.
Format: edit-app INDEX t/EXISTING_TAG(s) t/NEW_TAG(s)
Example:
-
edit-app 3 t/creditBearing t/nearHome: adds a newnearHometag to the 3rd application on the Application List Panel, assuming it has an existingcreditBearingtag.
Editing tags
If the application only has 1 existing tag, you can edit it using edit-app as follows:
Format: edit-app INDEX t/EDITED_TAG
Example:
-
edit-app 4 t/doResearch: edits the current tag of the 4th application on the Application List Panel todoResearch.
If the application has more than 1 existing tag, you have to enter the edited tag(s) AND all other existing tags.
Format: edit-app INDEX t/EXISTING_TAG(s) t/EDITED_TAG(s)
Example:
-
edit-app 1 t/goodWelfare t/farFromHome t/highPay: assuming that the 1st application on the Application List Panel has existinggoodWelfare,farFromHomeandpayUnknowntags, modifiespayUnknowntohighPay.
Deleting tags
You can remove all existing tags from an application using edit-app as follows:
Format: edit-app INDEX t/ (i.e. without specifying any values after t/)
t/ prefix can be associated with an empty parameter.
Otherwise, to remove any combination of existing tags, simply enter the tags that you wish to keep.
Format: edit-app INDEX t/EXISTING_TAG(s)_EXCLUDING_THOSE_TO_DELETE
Example:
-
edit-app 1 t/workFromHome: removes all other tags exceptworkFromHomefrom the 1st application on the Application List Panel, assuming the application had theworkFromHometag initially. -
edit-app 2 t/creditBearing t/mentoringProvided: removes all other tags exceptcreditBearingandmentoringProvidedfrom the 2nd application on the Application List Panel, assuming the application had thecreditBearingandmentoringProvidedtags initially.
Return to the Table of Contents.
4.2 Managing Tasks
This sub-section consists of commands that are related to managing tasks in sprINT.
4.2.1 Adding a task : add-task
Adds a new task to an existing application.
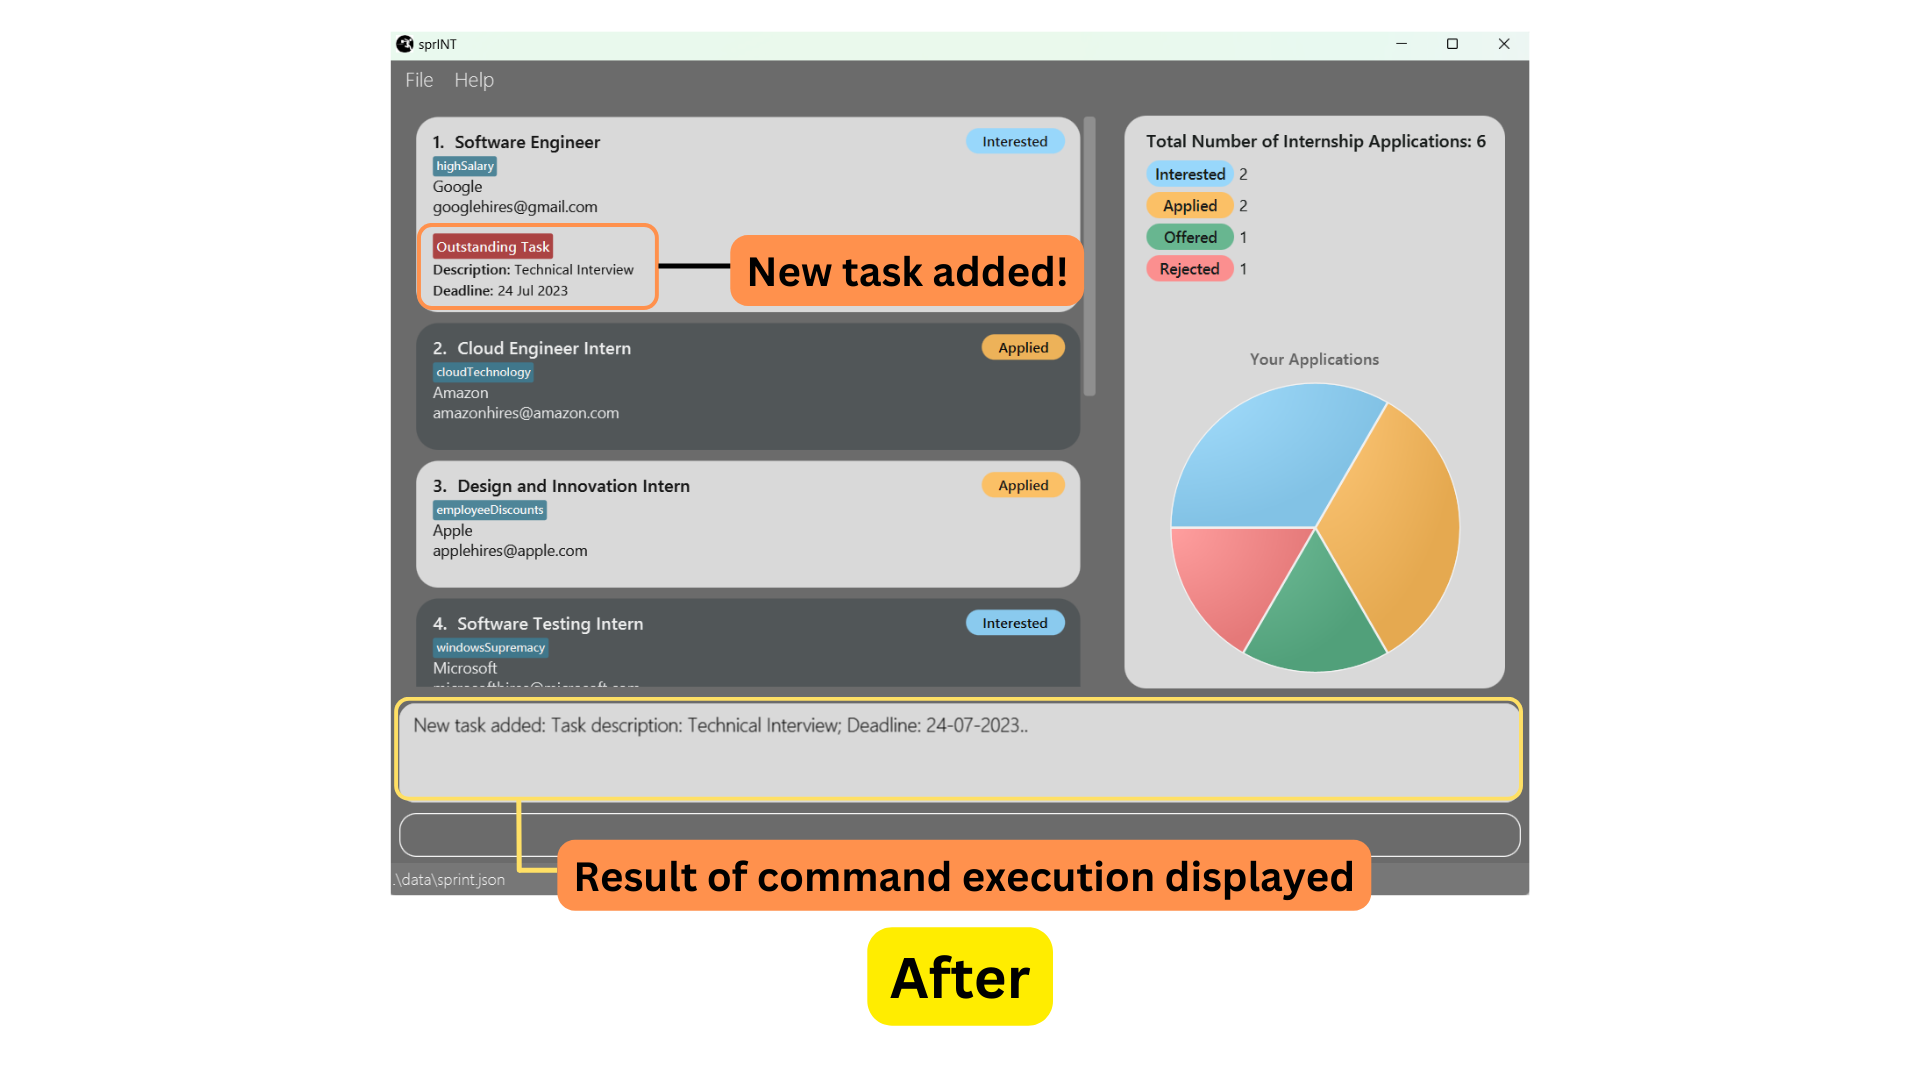
Google for their Software Engineer role, and made an entry for it in the
internship book. Then, Google reached out to you for a technical interview on the 24th of July, 2023. You can add this
as a task to the existing application entry using the command: add-task 1 d/Technical Interview by/24-07-2023
(assuming that it is showing up as the first application on the Application List Panel).
You may refer to the screenshots below for the before and after comparison of the execution of the add-task command.
Format: add-task INDEX d/DESCRIPTION by/DEADLINE
The following table details the parameters to be used with the add-app command:
| Prefix | Parameter | Compulsory | Constraints |
|---|---|---|---|
d/ |
Description | Yes | Must be alphanumeric characters or spaces only. Cannot be empty. |
by/ |
Deadline | Yes | Must be a valid calendar date of the format DD-MM-YYYY. |
Additional things to note:
-
INDEXrefers to the index of the application you wish to add a task to, as shown in the Application Card. It must be a positive integer. -
INDEXcannot be greater than 2147483647.
4.2.2 Editing a task : edit-task
Edits an existing task for the application that you specify.
Interview on 24 July 2023 for your application to the
Software Engineer role at Google. However, you just received an email notifying you that the interview would be
rescheduled to 30 July. You can modify the deadline of the existing task using the command: edit-task 1 by/30-07-2023
(assuming that the application is showing up as the first one on the Application List Panel).
Format: edit-task INDEX [d/DESCRIPTION] [by/DEADLINE]
Additional things to note:
-
INDEXrefers to the index of the application you wish to edit the task of, as shown in the Application Card. It must be a positive integer. -
INDEXcannot be greater than 2147483647. - At least one of the optional parameters must be provided.
- Existing description and/or deadline of the task will be updated to what you have inputted.
- For more information about each parameter’s constraints, refer to the table in section 4.2.1.
- For more information about each parameter and other sprINT-specific terminology, feel free to refer to our Glossary.
Examples:
-
edit-task 1 d/Accept offer by/09-07-2023: edits the description and deadline of the task for the 1st application on the Application List Panel to beAccept offerand09-07-2023respectively.
4.2.3 Deleting a task : delete-task
Deletes an existing task from the specified application.
Software Engineer role at Google.
You can choose to remove the task from the application entry using the command: delete-task 1 (assuming that the
application is showing up as the first one on the Application List Panel).
Format: delete-task INDEX
-
INDEXrefers to the index of the application you wish to delete the task from, as shown in the Application Card. It must be a positive integer. -
INDEXcannot be greater than 2147483647.
Examples:
-
listfollowed bydelete-task 2: deletes the task for the 2nd application on the Application List Panel. -
find Googlefollowed bydelete-task 1: deletes the task of the 1st application on the Application List Panel after the execution of thefindcommand.
Return to the Table of Contents.
4.3 Managing Display of Applications
This sub-section consists of commands that can affect the view of applications in the Application List Panel.
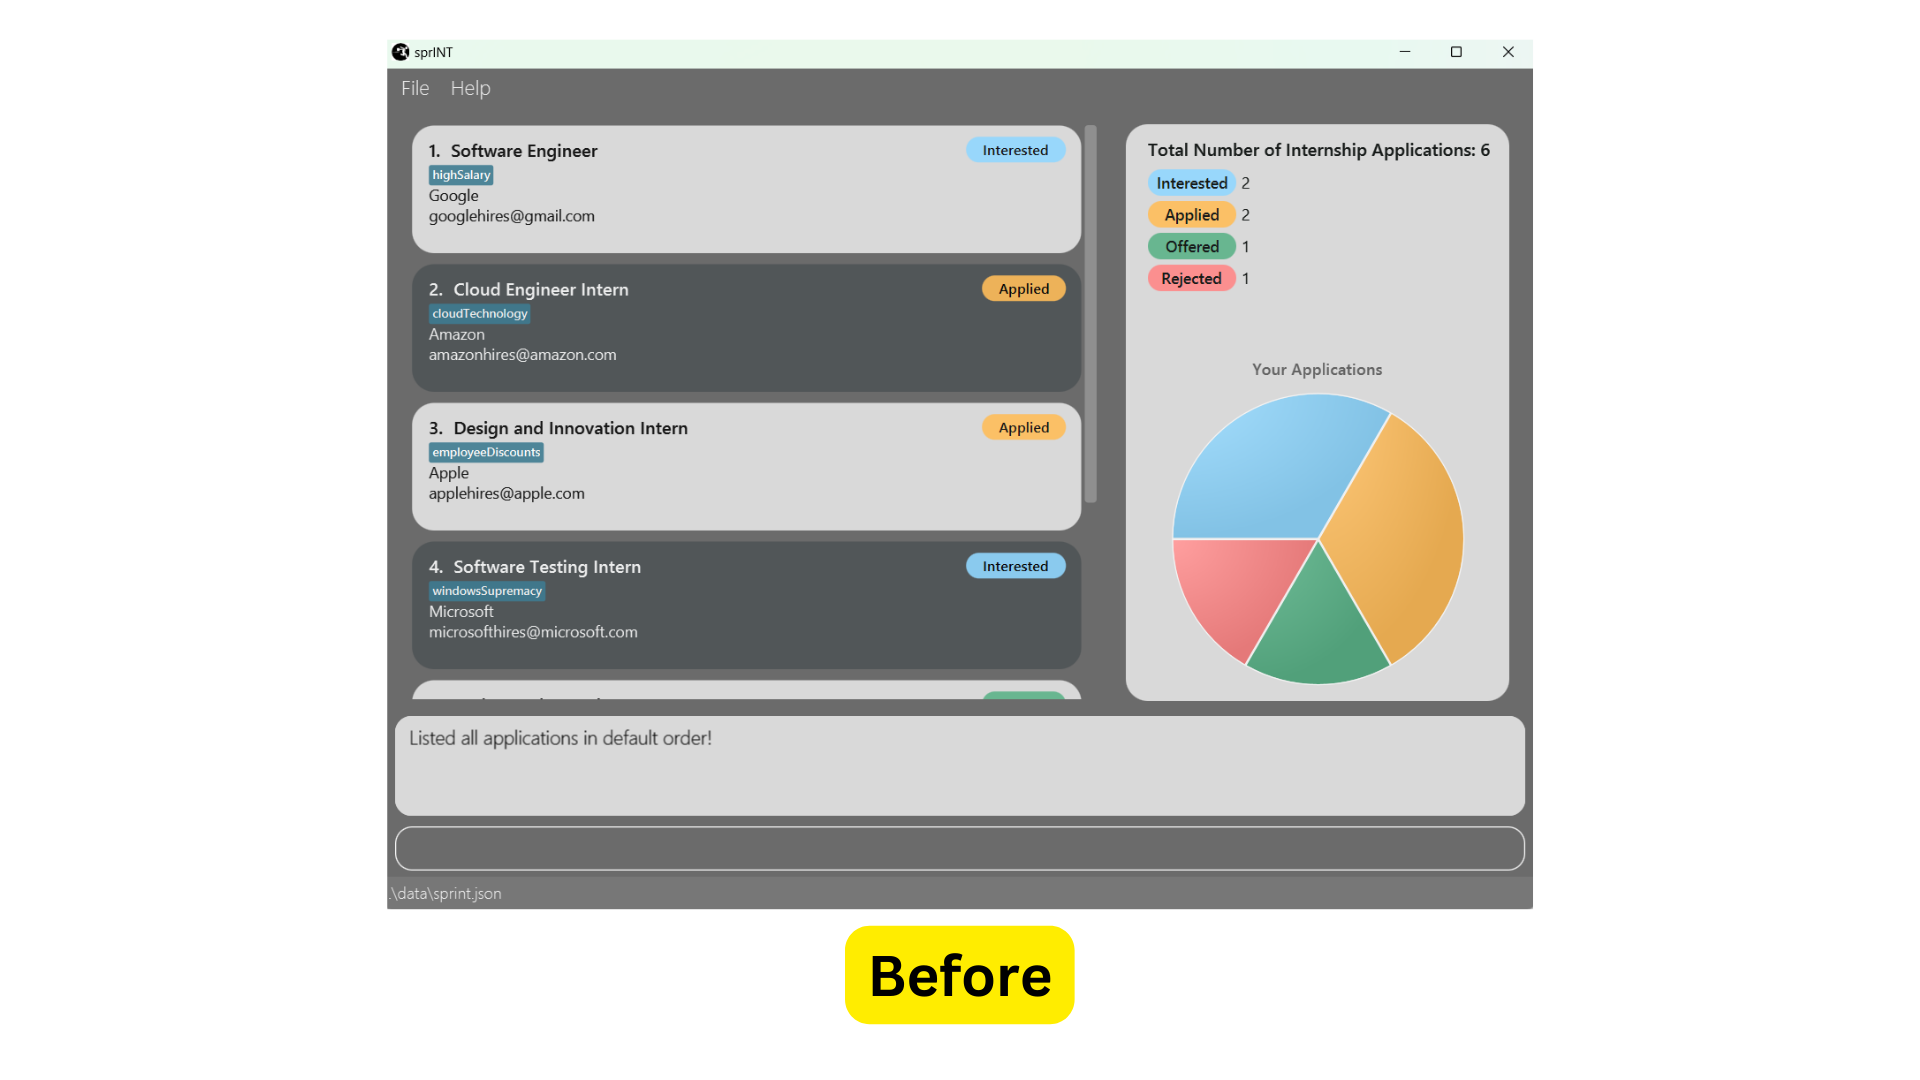
4.3.1 Listing all applications : list
Shows you a list of all your internship applications, in the order of when they are added. Application entries that are added more recently will be shown on top.
Format: list
4.3.2 Finding applications : find
Finds internship applications with information containing any of the given keywords amongst all existing applications.
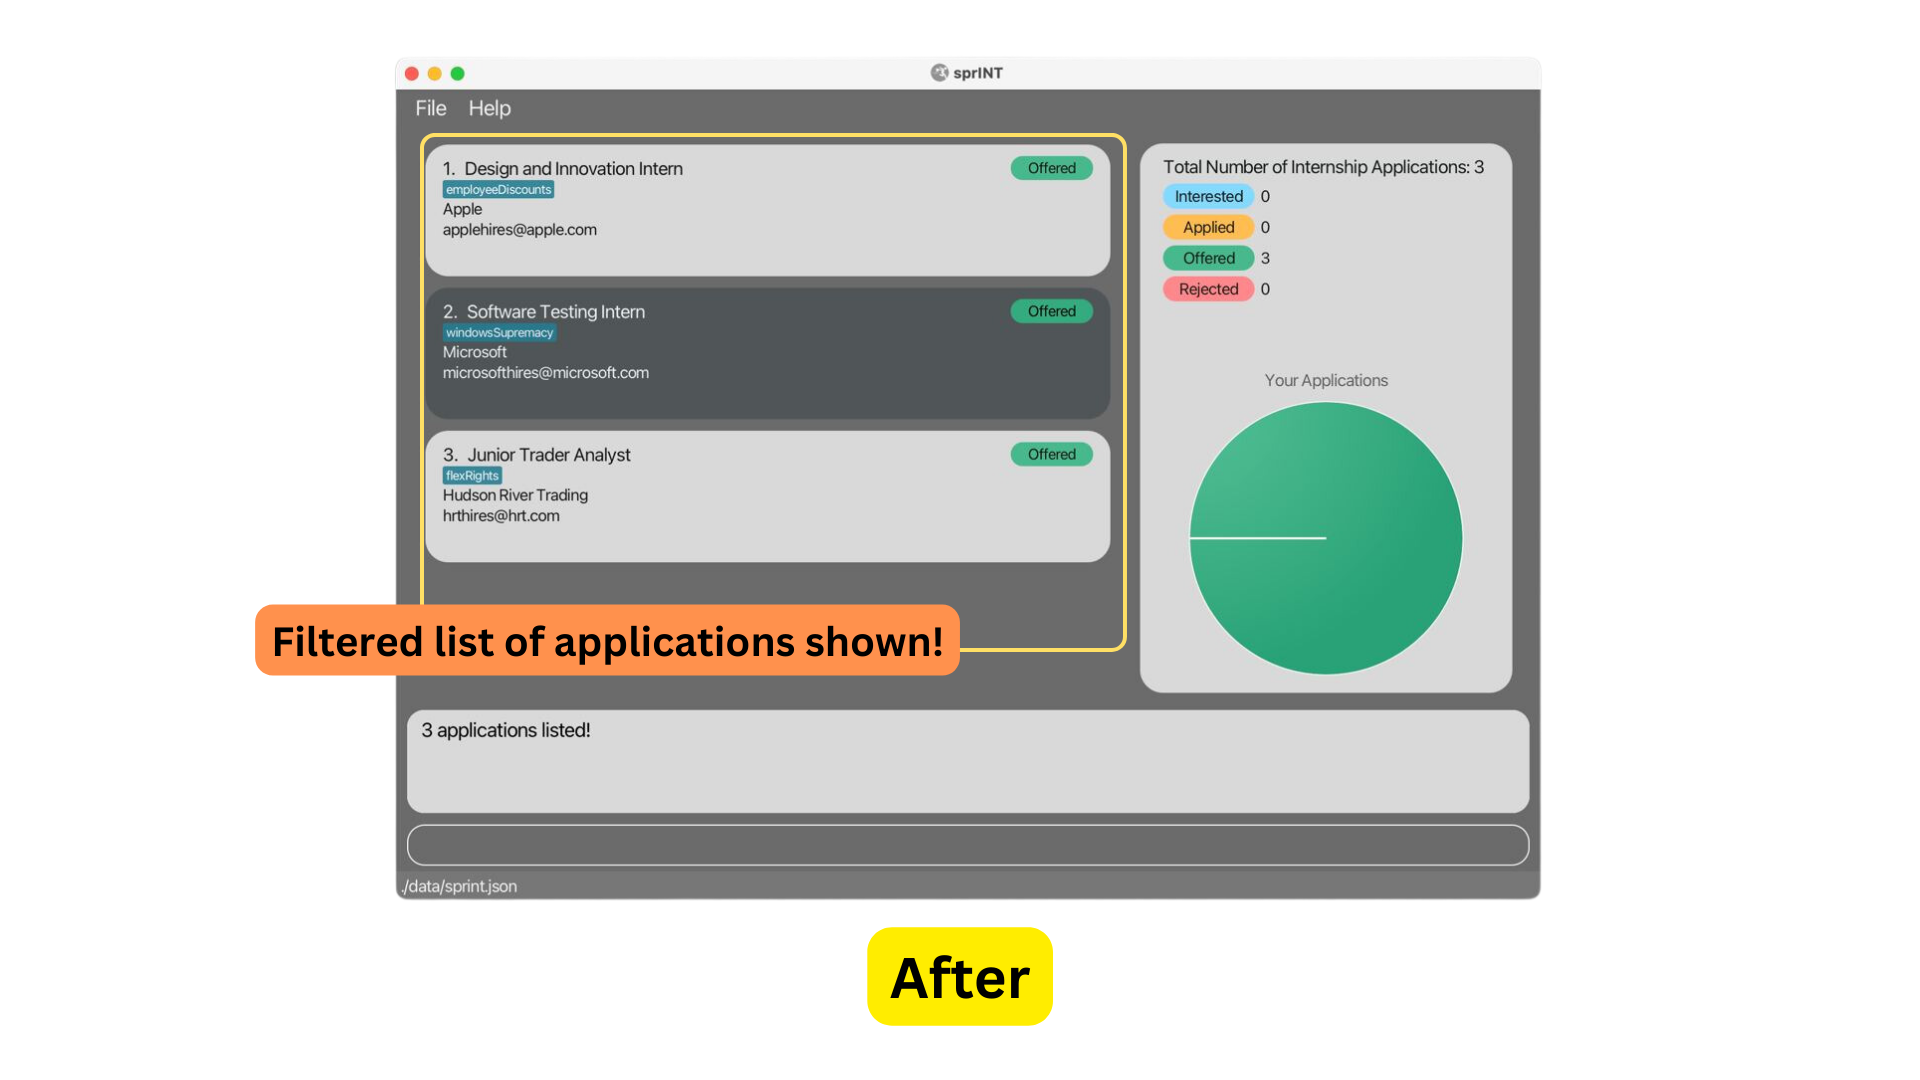
find s/offered, the applications with companies that have responded with an offer will be listed. Thanks to this, you can see all your offers at a quick glance! You may refer to the screenshots below for the before and after comparison of the execution of the find command.
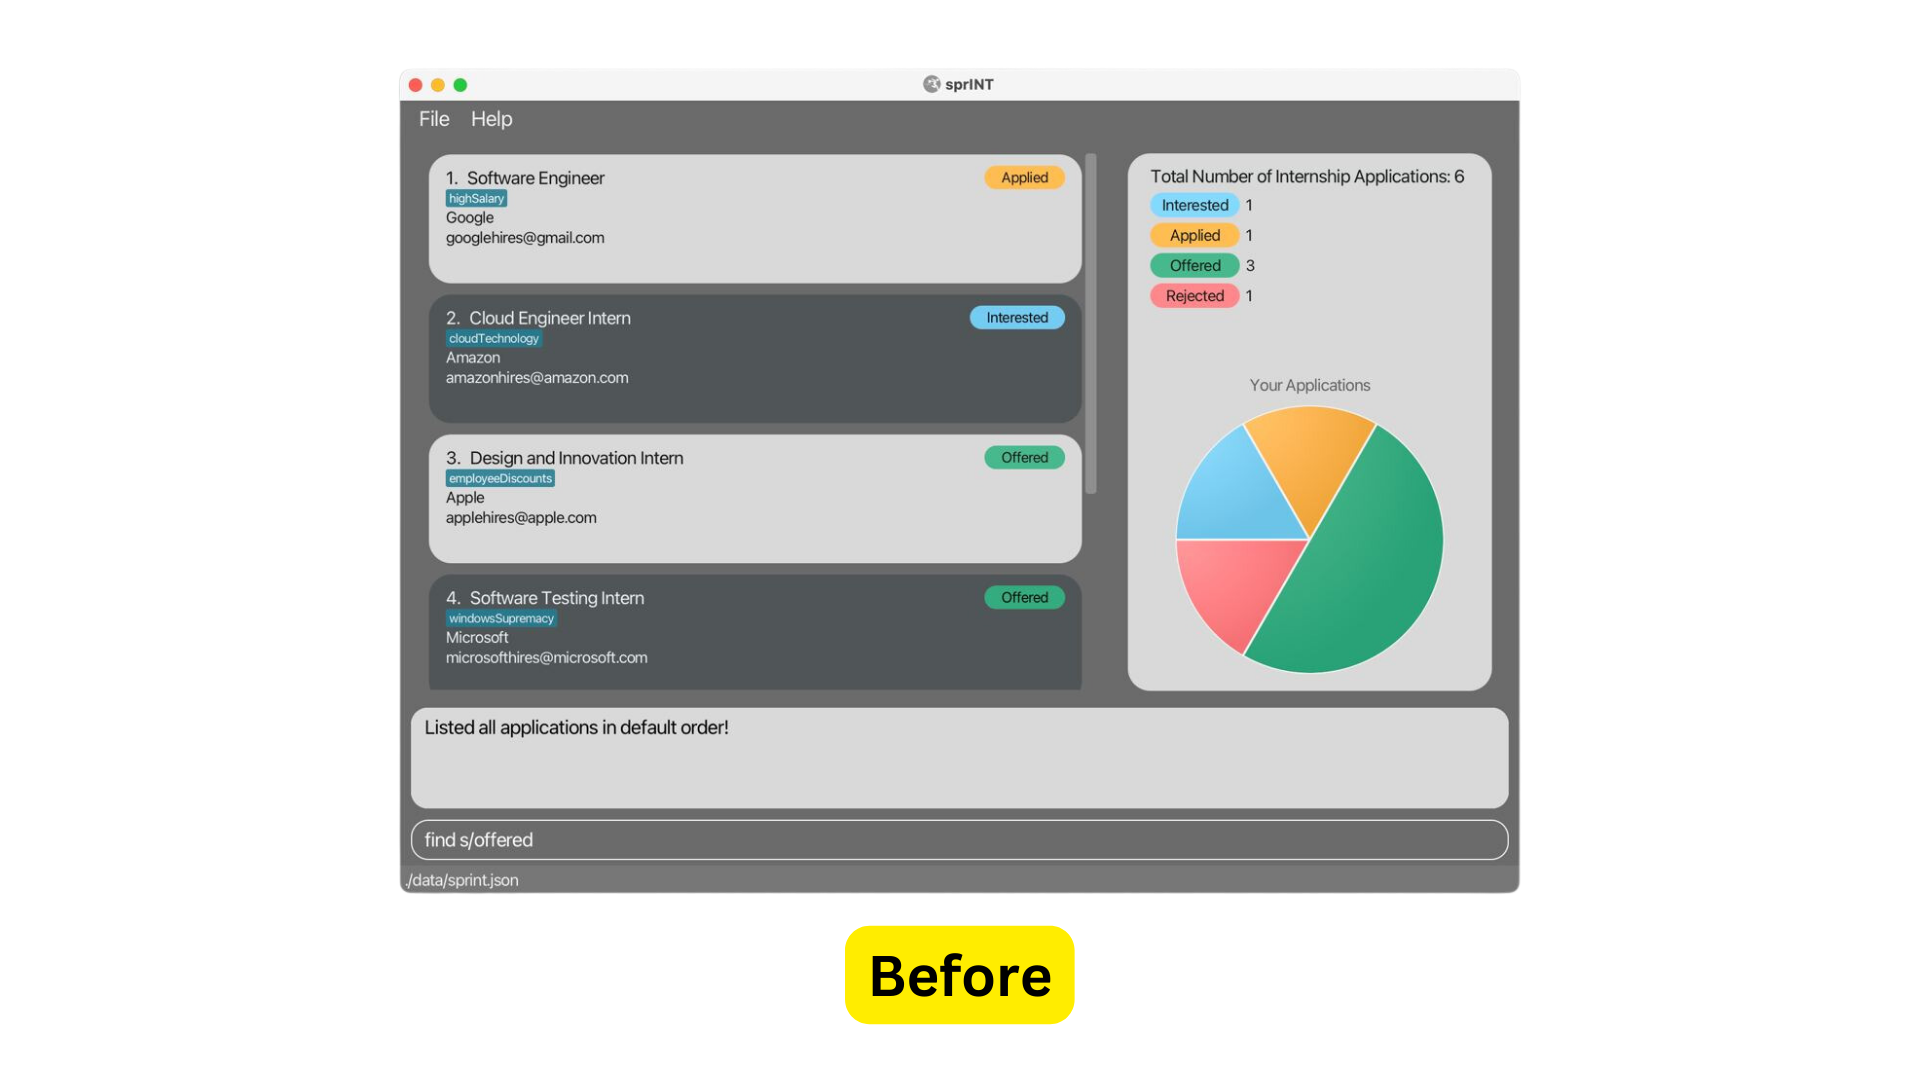
Format: find keywords(s) or find [r/keyword(s)] [c/keyword(s)] [s/keyword(s)]
Additional things to note:
- The keywords are case-insensitive. e.g. You can type
GOoGlEand it will match withGoogle. - In
find [r/keyword(s)] [c/keyword(s)] [s/keyword(s)],r/,c/ands/are prefixes that represent theROLE,COMPANY NAMEandSTATUSparameters respectively. - In
find keyword(s), if none of the prefixes is specified, the keyword(s) will be searched according to the information under all 3 prefixes mentioned. - When at least one prefix is provided, the keyword(s) is searched according to the information under that particular prefix.
- Only full words will be matched e.g.
Hanwill not matchHansbutGooglewill match withGoogle LLC.
Examples:
-
find Googlereturns internship applications forGoogleandGoogle LLC. -
find Google Metareturns internship applications forGoogle LLC,Meta Platforms. -
find r/SWE Intern c/Meta s/Offeredreturns internship application(s) for the role ofSWE InternatMetathat is of the statusOffered.
4.3.3 Sorting applications : sort
Sorts internship applications in the order you desire. Please read on to understand how sort behaves with
different parameters.
list command if you wish to return to the default list and order of applications.
Format: sort SEQUENCE ORDER
The following table details the parameters to be used with the sort command:
| Parameter | Compulsory | Constraints |
|---|---|---|
| Sequence | Yes | Must be either a or d. |
| Order | Yes | Must be either alphabetical or deadline. |
Additional things to note:
-
aanddforSEQUENCErefer to ascending and descending respectively. - Currently, there are two
ORDERs you can choose from:alphabeticalanddeadline.
Case 1: Sorting current list of applications by role name
Choosing alphabetical will sort applications currently displayed in the Application List Panel by their roles in alphabetical order according to the specified sequence. Should
there be multiple application entries with the same role, their company names will be used as a tiebreaker.
In the event that there is still a tie (i.e., two applications with same role, same company), then they will be ranked in the order of when they are created;
more recently created application entries will be shown higher up in the list.
Case 2: Sorting all applications by task deadline
sort a deadline.
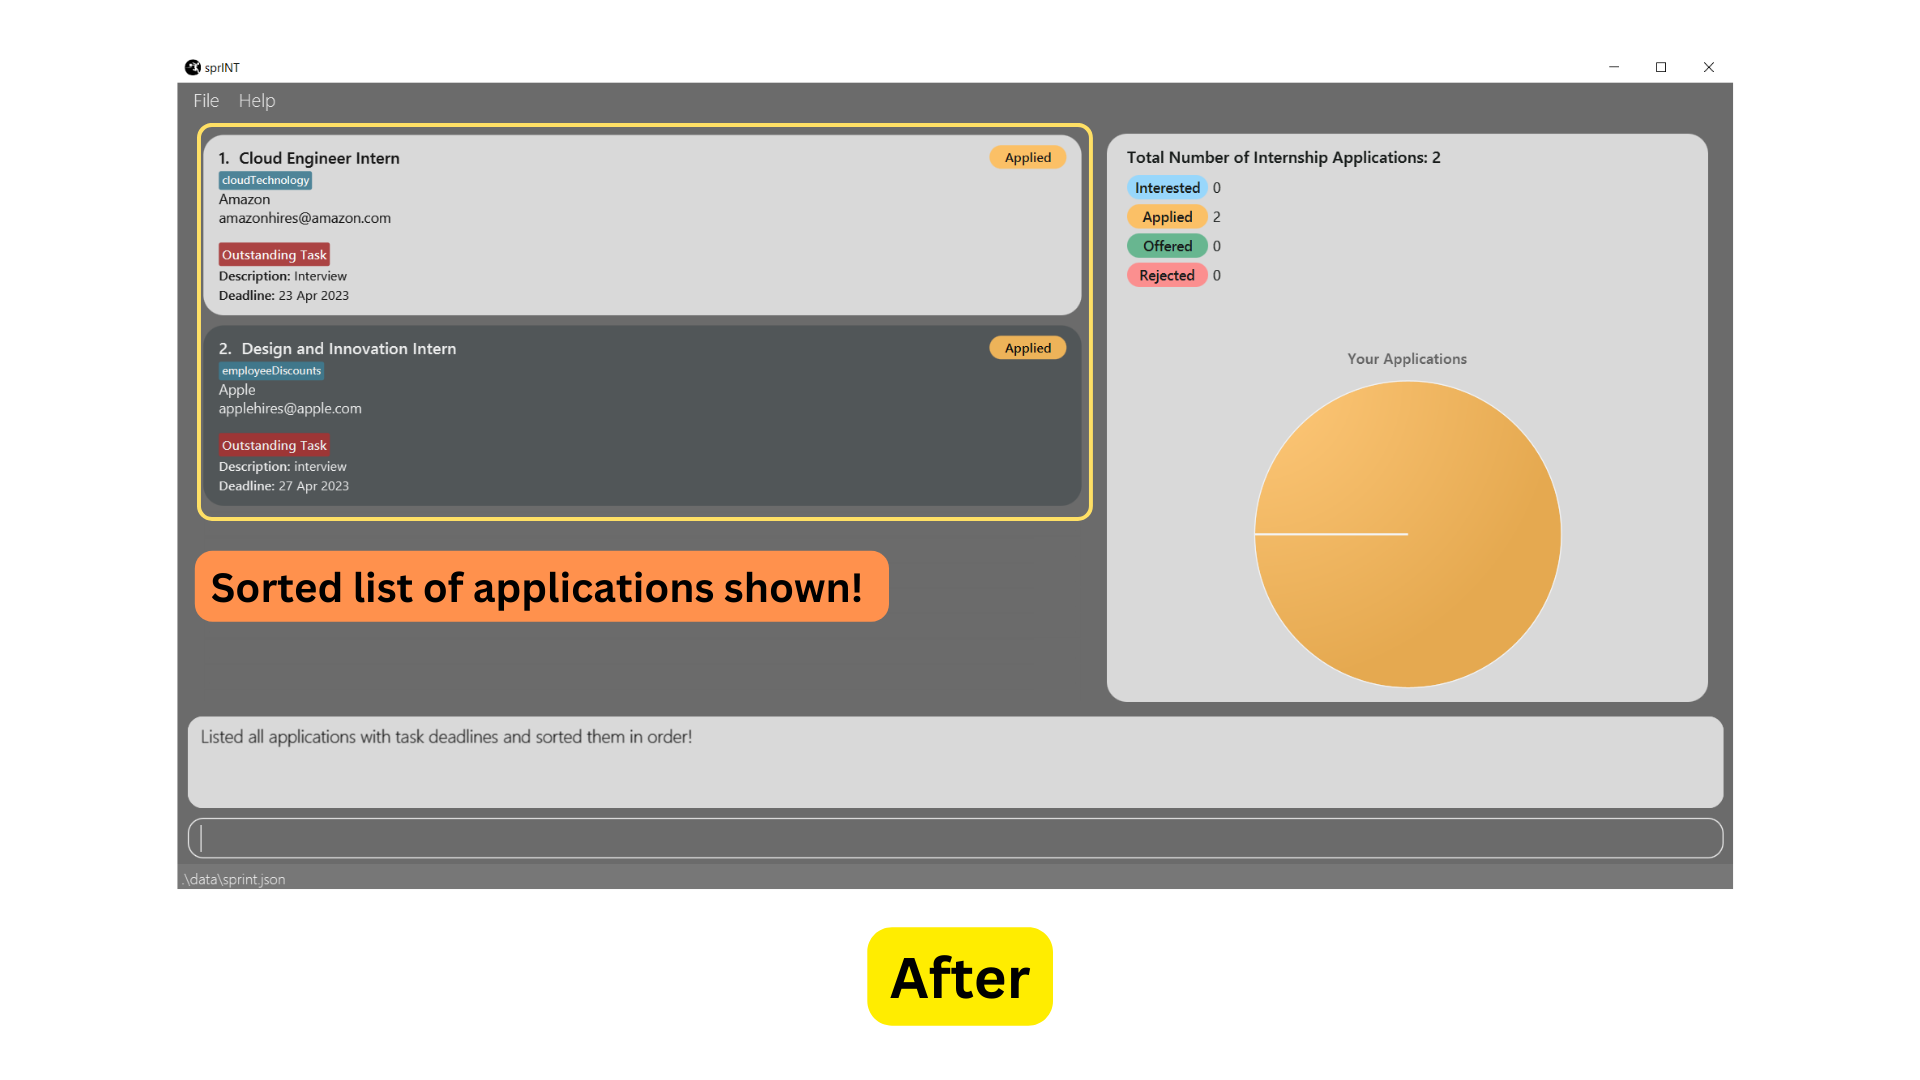
Choosing deadline will retrieve and display all existing applications with tasks (and therefore, deadlines).
If there are no applications that have tasks associated with them, an empty list will be displayed.
The applications will be sorted by their task’s deadline according to the specified sequence. In the example shown in the screenshots above where the sequence
a is specified for ascending sequence, you can see that the application to Apple is placed higher, as it has a task deadline for an Interview
on 27 Apr 2023, compared to 29 Apr 2023 for the application to Amazon.
Should there be two applications with the same task deadline however, the application entry that is more recently created will show up higher in the list.
Other examples:
-
sort d deadlinewill fetch and display all applications with task deadlines, except those with further deadlines will be higher up in the list instead. -
sort a alphabeticalwill rearrange applications currently displayed in the Application List Panel in the usual alphabetical order. (A to Z)
Return to the Table of Contents.
4.4 Miscellaneous
This sub-section consists of other miscellaneous commands in sprINT.
4.4.1 Viewing help : help
Displays a pop-up window with a simple summary of all the commands and their formats. The help window that pops up will also have a button you can click to access the URL to this guide.
Format: help
4.4.2 Undoing a command : undo
Undoes the previous command that you have typed in.
edit-app 3 s/offered, when the correct index should be 4. Luckily, you can quickly undo this error simply by using
the command: undo. Now, you can proceed to type the correct command.
You may refer to the screenshots below for the before and after comparison of the execution of the undo command.
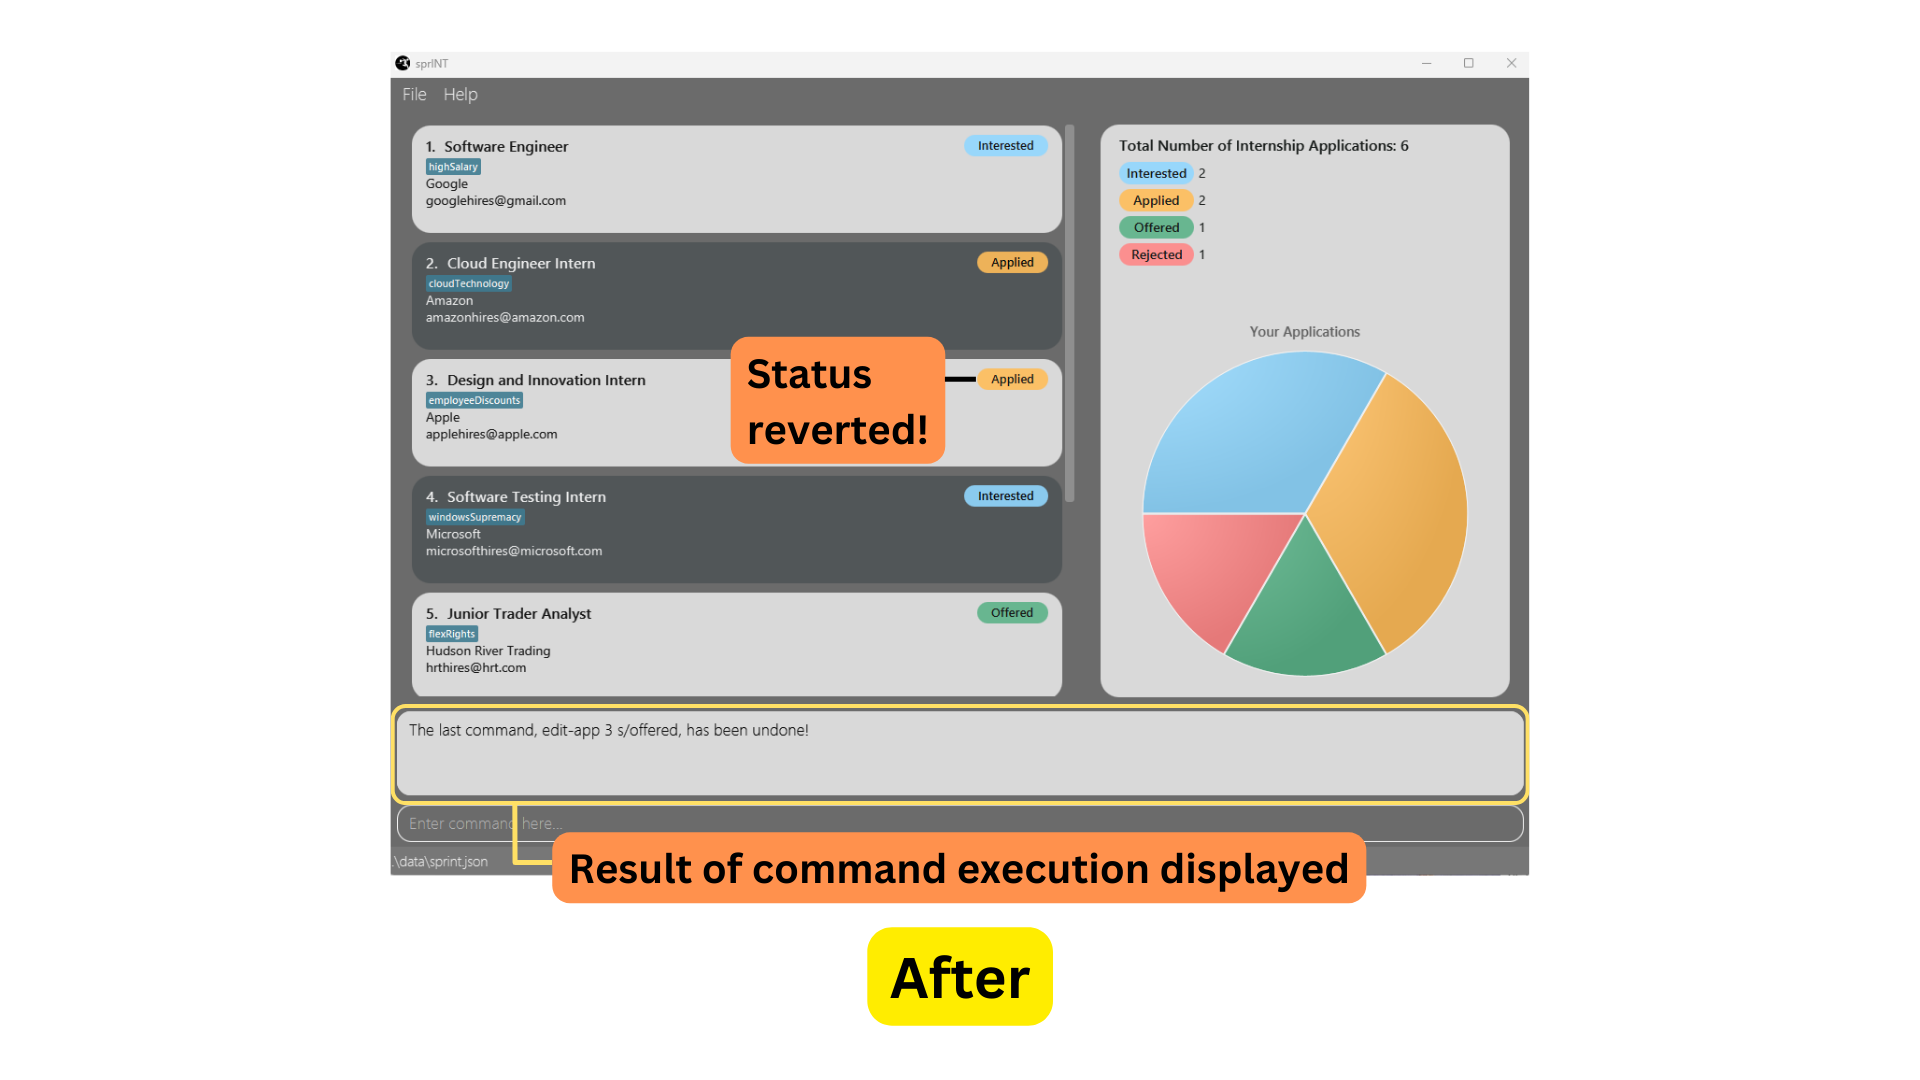
Note that you can append extra characters after undo, but all these characters will be ignored, and the basic undo command will be executed.
add-app, edit-app, delete-app, add-task, edit-task, delete-task, redo and clear can be undone.undo works for all applicable commands that were executed during the current session. Commands issued in previous
sessions cannot be undone.
Format: undo
4.4.3 Redoing a command : redo
Redoes the previous command that you have undo-ed.
Note that you can append extra characters after redo, but all these characters will be ignored, and the basic redo command will be executed.
Format: redo
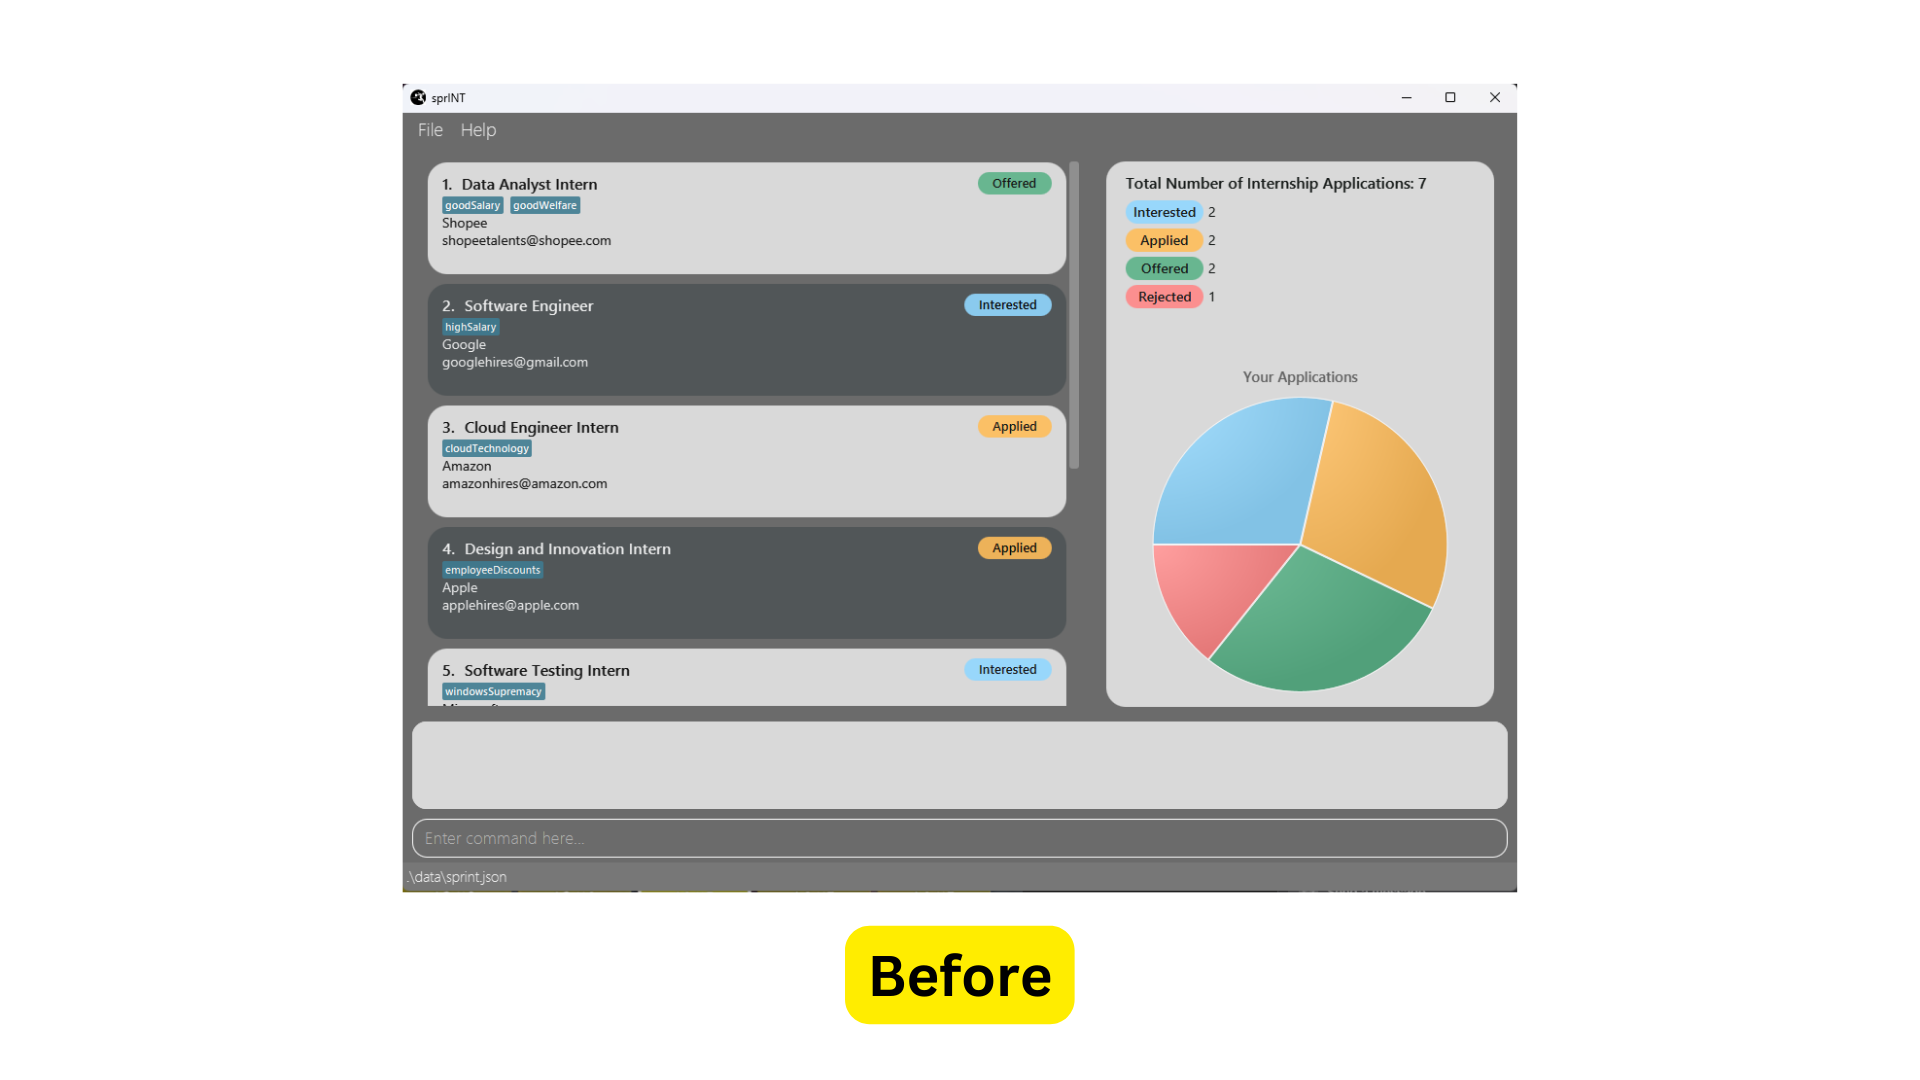
4.4.4 Viewing application statistics
Displays statistics information for the current list of applications shown in the Application List Panel.
This includes the total number of applications currently displayed in the Application List Panel, as well as a breakdown of these applications by status (shown both in numbers and as a pie chart).
Format: no command is needed. Application statistics are recomputed and regenerated upon every command execution.
You may refer to the screenshots below for the before and after comparison of the Statistics panel, after an application’s
status was changed from interested to applied.
4.4.5 Clearing all applications : clear
Clears all existing application entries.
Format: clear
clear command must be used with extreme caution, as it might potentially lead to highly undesirable outcomes.
If you accidentally issued the clear command, use the undo command to revert to the previous state.
4.4.6 Exiting the program : exit
Exits the program. Alternatively, you can exit the program by clicking the top-right X button to close the window. sprINT updates your data periodically, so you don’t have to worry about unsaved or possible loss of data when exiting the program.
Format: exit
4.4.7 Saving the data
Changes you’ve made to your applications are automatically saved in your local storage after each command you execute that modifies the application data. There is no need to save manually.
4.4.8 Editing the data file (for Advanced users)
Data in the internship book are actually saved as a JSON file [JAR file location]/data/sprint.json.
Advanced users are welcome to update their data directly by editing that data file.
Return to the Table of Contents.
5. FAQ
Q: How do I transfer my data to another computer?
A: Install sprINT on the other computer and run it for the first time. A new data file will be created with
the sample data. Overwrite this data file with the original data file from the computer you have been using sprINT on previously.
Have more questions or suggestions on how to improve sprINT? Feel free to contact us via our emails at our About Us page.
Return to the Table of Contents.
6. Glossary
6.1 sprINT-related Terminology
Application
Represents an internship application entry in the internship book. Each application contains minimally a role, company name, company email and one of four possible statuses. An application may also have 1 or more tags and 1 task associated with it.
Command word
Refers to the first word in a valid user command. Examples include add-app, undo and sort. Non-examples include edit, hello and 12345.
Prefix
Refers to a short sequence of characters ending in a slash (‘/’) that precedes a parameter value. It indicates
the type of information that follows. For example, r/ is the prefix for the role parameter and s/ is the prefix
for the status parameter.
Parameter
Refers to a specific input value from the user that provides details to execute a command. Most parameters, other than
the INDEX and SEQUENCE parameters, are identified by its prefix. Examples include c/COMPANY_NAME,
d/DESCRIPTION and by/DEADLINE.
Status
Represents the current stage of the internship application. Can be one of 4 values:
- Interested: An internship that the user is interested in, but has yet to apply to.
- Applied: An internship that the user has applied to, but has yet to receive an offer or rejection for.
- Offered: An internship that the user has received an offer for.
- Rejected: An internship that the user has been rejected for.
Task
Represents additional milestones that are part of the internship application process. Examples include online assessment, technical interview, etc.
6.2 Others
Command terminal
A program on your computer that enables you to interact with your computer with text commands, instead of through a graphical interface. On Windows, this is either the Command Prompt or Powershell. On Mac, this is the Terminal.
Home folder
The folder that will contain all sprINT-related data (including the application itself).
Integer
A whole number like 1, 3, 5, 8 etc. Numbers with decimals like 2.1, 4.002 are not considered integers.
JSON (Javascript Object Notation)
JSON is a way of storing and sharing data in a simple and standardised format that can be easily read by computers and understood by humans. sprINT uses JSON to store all your applications because it is lightweight, which means that sprINT can process your data more quickly!
Return to the Table of Contents.
7. Command Summary
| Action | Can undo? | Format, Examples |
|---|---|---|
|
Add Application |
add-app r/ROLE c/COMPANY_NAME e/COMPANY_EMAIL s/STATUS [t/TAG(s)] e.g. add-app r/Teaching Assistant c/NUS SOC e/ta_portal@nus.edu.sg s/Offered t/creditBearing
|
|
|
Edit Application |
edit-app INDEX [r/ROLE] [c/COMPANY_NAME] [e/COMPANY_EMAIL] [s/STATUS] [t/TAG(s)] e.g. edit-app 1 r/Cloud Engineer e/googleHR@gmail.com
|
|
|
Delete Application |
delete-app INDEX e.g. delete-app 1
|
|
|
Add Task |
add-task INDEX d/DESCRIPTION by/DEADLINE e.g. add-task 1 d/Technical Interview by/01-05-2023
|
|
|
Edit Task |
edit-task INDEX [d/DESCRIPTION] [by/DEADLINE] e.g. edit-task 1 d/Accept offer by/09-07-2023
|
|
|
Delete Task |
delete-task INDEX e.g. delete-task 1
|
|
| List | list |
|
| Find |
find keyword(s) e.g. find Meta find [r/keyword(s)] [c/keyword(s)] [s/keyword(s)] e.g. find r/SWE Intern c/Meta s/Offered
|
|
| Sort |
sort SEQUENCE ORDER e.g. sort d alphabetical or sort a deadline
|
|
| Help | help |
|
| Undo | undo |
|
| Redo | redo |
|
| Clear | clear |
|
| Exit | exit |